blog

Verbindung zu SLES (OpenSUSE) nach frischer Installation nicht möglich

Die SSH Verbindung zu einem neuen frisch installierten OpenSUSE bzw. SLES ist nich möglich.

In der OpenSUSE Installation (Version 11) ist die Verbindung von externen Systemen über SSH nicht erlaubt.

tomas@ubuntu:~$ ssh -vvvv root@sles1
OpenSSH_7.2p2 Ubuntu-4ubuntu1, OpenSSL 1.0.2g-fips  1 Mar 2016
debug1: Reading configuration data /etc/ssh/ssh_config
debug1: /etc/ssh/ssh_config line 19: Applying options for *
debug2: resolving "sles1" port 22
debug2: ssh_connect_direct: needpriv 0
debug1: Connecting to sles1 [10.0.2.7] port 22.
debug1: connect to address 10.0.2.7 port 22: Connection timed out
ssh: connect to host sles1 port 22: Connection timed out

Schritte:

  1. Verifiziere das auf dem OpenSUSE System die Firewall für SSH geöffnet ist.  $ iptables -nL | grep 22 soll Ergebnisse liefern:
  2. Öffnen Firewall für SSH Daemon $ yast firewall und navigiere Allowed Services -> Service to Allow -> Secure Shell Server -> Add -> Next -> Finish

Um sich als root auf dem OpenSUSE Sever mit angaben von Passwort anmelden zu können, muss dies in ssh erlaubt sein (Eintrag PermitRootLogin yes).
$ vi /etc/ssh/sshd_config

PermitRootLogin yes


Ansible – Wie erfahre ich die Linux Distribution

Wie erfahre ich die Linux Distribution in Ansible?

  • Wie erfahre ich, welche Linux Distribution das Zielsystem hat?
  • Wie begrenze ich die Ausführung vom ansible tasks auf einige Linux Distributionen?

Ansible speichert automatisch die Beschreibung der linux Distribution in den folgenden Variablen:
ansible_distribution, ansible_distribution_release und ansible_distribution_version. (Mehr dazu in Ansible Best Practise)

Um die Distribution Information zu erhalten:  ansible all -m setup -a "filter=ansible_distribution*"

Mit dem Ergebnis:

"ansible_distribution": "CentOS",
"ansible_distribution_release": "Final",
"ansible_distribution_version": "6.4"

und um die tasks nur bei einigen Distributionen in ansible playbook durchzuführen
when: ansible_distribution == 'CentOS'

Konfiguriere Network / Netz im CentOS6.8 minimal

Nach der Installation von CentOS 6.8 minimal ist per default das Netz / Network ausgeschaltet.

Zu erst soll das Netz automatisch beim boot aktiviert sein und die IP Adresse soll von DHCP kommen.

$ vi /etc/sysconfig/network-scripts/ifcfg-eth0

DEVICE=eth0
HWADDR=08:00:27:C4:9D:C8
TYPE=Ethernet
ONBOOT=yes
BOOTPROTO=dhcp

$ service network restart
$ service network status

Konfigurierte Geräte:
lo eth0
Derzeit aktive Geräte:
lo eth0

SSH Anmeldung ohne Passwort

Sie möchten sich vom Rechner A auf einem fremden Rechner B ohne Password-Eingabe mittels ssh anmelden. Die Anmeldung erfolgt somit mittels public keys.
Eine Voraussetzung dafür ist die Erstellung von SSH key pair (siehe Erstelle SSH key pair in Ubuntu).

  1. Verifizieren Sie die Anmeldung
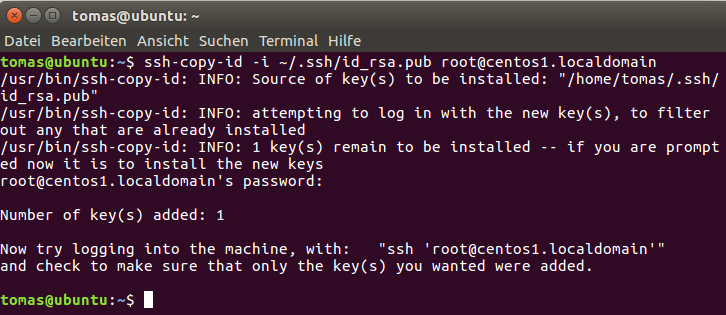
  2. $ tomas@ubuntu:~$ ssh-copy-id -i ~/.ssh/id_rsa.pub BENUTZER@ZIELRECHNER (Beispiel: $ tomas@ubuntu:~$ ssh-copy-id -i .ssh/id_rsa.pub martin@centos1.localdomain)
    • BENUTZER ist Benutzer auf dem Zielrechner
    • ZIELRECHNER Name des Zielrechners

    ssh-copy-id

  3. Anmeldung ohne Password möglich $ ssh root@centos1.localdomain
  4. ssh root


Install and Configure Ansible on Ubuntu 16.04

Einführung

Die Konfiguration und Management von mehreren Servern ist eine Zeit intensive Aufgaben in der heutige IT. Das Produkt Ansible adressiert diese Problematik und unterstütz die automatische Administration aus einem zentralen Ort.

Es gibt mehrere Konfiguration und Management (u.a. Chef und Puppet) für Linux Systeme, die aber eine höhere Komplexität mitbringen. Ansible scheint eine alternative mit niedrigerem Overhead und bietet schnelleren Einstieg.

Kommunikation

Ansible führt die gewollten Anpassungen am Zielsystem ausschließlich über ssh. Damit ist kein zusätzlichen Paket / Software / Client am Zielsystem benötigt.

Die Ansible Module können in beliebige Sprache geschrieben werden und die Kommunikation wird über JSON Standardabgewickelt. Die Modul-Konfiguration wird mit YAML definiert.

Ansible kommuniziert mit dem Zielsystem entweder über command line oder über die Playbooks (Konfiguration Skripte).

Installation

(1) Install Ansible PPA

$ sudo apt-get install software-properties-common

Paketlisten werden gelesen... Fertig
Abhängigkeitsbaum wird aufgebaut.       
Statusinformationen werden eingelesen.... Fertig
software-properties-common is already the newest version (0.96.20).
software-properties-common wurde als manuell installiert festgelegt.
0 aktualisiert, 0 neu installiert, 0 zu entfernen und 245 nicht aktualisiert.

$ sudo apt-add-repository ppa:ansible/ansible

 Ansible is a radically simple IT automation platform that makes your applications and systems easier to deploy. Avoid writing scripts or custom code to deploy and update your applications— automate in a language that approaches plain English, using SSH, with no agents to install on remote systems.

http://ansible.com/
 Mehr Informationen: https://launchpad.net/~ansible/+archive/ubuntu/ansible
Drücken Sie [ENTER], um fortzufahren oder Strg-c, um das Hinzufügen abzubrechen

Mögliche Fehlermeldung (1)

Traceback (most recent call last):
  File "/usr/lib/python3.5/urllib/request.py", line 1243, in do_open
    h.request(req.get_method(), req.selector, req.data, headers)
  File "/usr/lib/python3.5/http/client.py", line 1106, in request
    self._send_request(method, url, body, headers)
  File "/usr/lib/python3.5/http/client.py", line 1151, in _send_request
    self.endheaders(body)
  File "/usr/lib/python3.5/http/client.py", line 1102, in endheaders
    self._send_output(message_body)
  File "/usr/lib/python3.5/http/client.py", line 934, in _send_output
    self.send(msg)
  File "/usr/lib/python3.5/http/client.py", line 877, in send
    self.connect()
  File "/usr/lib/python3.5/http/client.py", line 1252, in connect
    super().connect()
  File "/usr/lib/python3.5/http/client.py", line 849, in connect
    (self.host,self.port), self.timeout, self.source_address)
  File "/usr/lib/python3.5/socket.py", line 693, in create_connection
    for res in getaddrinfo(host, port, 0, SOCK_STREAM):
  File "/usr/lib/python3.5/socket.py", line 732, in getaddrinfo
    for res in _socket.getaddrinfo(host, port, family, type, proto, flags):
socket.gaierror: [Errno -2] Der Name oder der Dienst ist nicht bekannt

During handling of the above exception, another exception occurred:

Traceback (most recent call last):
  File "/usr/lib/python3/dist-packages/softwareproperties/ppa.py", line 102, in _get_https_content_py3
    lp_page = urllib.request.urlopen(request, cafile=LAUNCHPAD_PPA_CERT)
  File "/usr/lib/python3.5/urllib/request.py", line 162, in urlopen
    return opener.open(url, data, timeout)
  File "/usr/lib/python3.5/urllib/request.py", line 465, in open
    response = self._open(req, data)
  File "/usr/lib/python3.5/urllib/request.py", line 483, in _open
    '_open', req)
  File "/usr/lib/python3.5/urllib/request.py", line 443, in _call_chain
    result = func(*args)
  File "/usr/lib/python3.5/urllib/request.py", line 1286, in https_open
    context=self._context, check_hostname=self._check_hostname)
  File "/usr/lib/python3.5/urllib/request.py", line 1245, in do_open
    raise URLError(err)
urllib.error.URLError: 

During handling of the above exception, another exception occurred:

Traceback (most recent call last):
  File "/usr/lib/python3/dist-packages/softwareproperties/ppa.py", line 327, in get_ppa_info
    ret = get_ppa_info_from_lp(user, ppa)
  File "/usr/lib/python3/dist-packages/softwareproperties/ppa.py", line 92, in get_ppa_info_from_lp
    return get_info_from_lp(lp_url)
  File "/usr/lib/python3/dist-packages/softwareproperties/ppa.py", line 88, in get_info_from_lp
    return _get_https_content_py3(lp_url)
  File "/usr/lib/python3/dist-packages/softwareproperties/ppa.py", line 108, in _get_https_content_py3
    raise PPAException("Error reading %s: %s" % (lp_url, reason), e)
softwareproperties.ppa.PPAException: 'Error reading https://launchpad.net/api/1.0/~ansible/+archive/ubuntu/ansible: [Errno -2] Der Name oder der Dienst ist nicht bekannt'

During handling of the above exception, another exception occurred:

Traceback (most recent call last):
  File "/usr/lib/python3/dist-packages/softwareproperties/ppa.py", line 393, in shortcut_handler
    return PPAShortcutHandler(shortcut)
  File "/usr/lib/python3/dist-packages/softwareproperties/ppa.py", line 356, in __init__
    info = get_ppa_info(self.shortcut)
  File "/usr/lib/python3/dist-packages/softwareproperties/ppa.py", line 339, in get_ppa_info
    _get_suggested_ppa_message(user, ppa))
softwareproperties.shortcuts.ShortcutException: Cannot add PPA: 'ppa:~ansible/ubuntu/ansible'.
ERROR: '~ansible' user or team does not exist.
Fehler: »ppa:ansible/ansible« ist ungültig!

Behebung
sudo visudo und folgende Zeile am Ende hinzufügen

Defaults env_keep="https_proxy"

Mögliche Fehlermeldung (2)

?: keyserver.ubuntu.com: Host not found

gpg: Schlüsselbund `/tmp/tmpx720827l/secring.gpg' erstellt
gpg: Schlüsselbund `/tmp/tmpx720827l/pubring.gpg' erstellt
gpg: Schlüssel 7BB9C367 von hkp-Server keyserver.ubuntu.com anfordern
?: keyserver.ubuntu.com: Host not found
gpgkeys: HTTP fetch error 7: couldn't connect: Success
gpg: Keine gültigen OpenPGP-Daten gefunden.
gpg: Anzahl insgesamt bearbeiteter Schlüssel: 0
gpg: Schlüsselserver-Datenübertragunsfehler: keyserver unreachable
gpg: Schlüsselserver-Datenübertragunsfehler: Öffentlicher Schlüssel nicht gefunden
gpg: Empfangen vom Schlüsselserver fehlgeschlagen: Öffentlicher Schlüssel nicht gefunden

Lösung ist in separatem Beitrag (TODO)

(2) Die Systempakete müssen geupdatet werden und Ansible installieren
sudo apt-get update
sudo apt-get install ansible

Paketlisten werden gelesen... Fertig
Abhängigkeitsbaum wird aufgebaut.       
Statusinformationen werden eingelesen.... Fertig
The following additional packages will be installed:
  python-crypto python-ecdsa python-httplib2 python-jinja2 python-markupsafe python-paramiko python-pkg-resources python-setuptools python-six python-yaml sshpass
Vorgeschlagene Pakete:
  python-crypto-dbg python-crypto-doc python-jinja2-doc python-setuptools-doc
Die folgenden NEUEN Pakete werden installiert:
  ansible python-crypto python-ecdsa python-httplib2 python-jinja2 python-markupsafe python-paramiko python-pkg-resources python-setuptools python-six python-yaml
  sshpass
0 aktualisiert, 12 neu installiert, 0 zu entfernen und 245 nicht aktualisiert.
Es müssen 2.182 kB an Archiven heruntergeladen werden.
Nach dieser Operation werden 13,8 MB Plattenplatz zusätzlich benutzt.
Möchten Sie fortfahren? [J/n] J
Holen:1 http://de.archive.ubuntu.com/ubuntu xenial/main amd64 python-markupsafe amd64 0.23-2build2 [15,5 kB]
...
sshpass (1.05-1) wird eingerichtet ...
ansible (2.1.0.0-1ppa~xenial) wird eingerichtet ...

Konfiguration

Die Ansible Installation ist somit abgeschlossen, die Konfiguration wird im separatem Beitrag erwähnt.
 

apt-get und keyserver.ubuntu.com: Host not found

Wenn ein neues repository apt-get hinzugefügt wird und der Zugang zum keyserver.ubuntu.com nicht möglich ist, wird folgender Fehler auftreten:
$ sudo apt-add-repository ppa:ansible/ansible

gpg: Schlüsselbund `/tmp/tmpsp6yyd5m/secring.gpg' erstellt
gpg: Schlüsselbund `/tmp/tmpsp6yyd5m/pubring.gpg' erstellt
gpg: Schlüssel 7BB9C367 von hkp-Server keyserver.ubuntu.com anfordern
?: keyserver.ubuntu.com: Host not found
gpgkeys: HTTP fetch error 7: couldn't connect: Success
gpg: Keine gültigen OpenPGP-Daten gefunden.
gpg: Anzahl insgesamt bearbeiteter Schlüssel: 0
gpg: Schlüsselserver-Datenübertragunsfehler: keyserver unreachable
gpg: Schlüsselserver-Datenübertragunsfehler: Öffentlicher Schlüssel nicht gefunden
gpg: Empfangen vom Schlüsselserver fehlgeschlagen: Öffentlicher Schlüssel nicht gefunden

Lösung
Die OpenPGP Key muss manuell eingetragen werden. Dieser Fehler trifft häufig bei der Verwendung von Proxy.

Verifiziere dass der Zugang zum ubuntu.com generell möglich ist:
$ sudo apt-key adv --keyserver keyserver.ubuntu.com:80 --recv 7BB9C367

Executing: /tmp/tmp.5zvgFDUFQq/gpg.1.sh --keyserver
keyserver.ubuntu.com:80
--recv
7BB9C367
gpg: Schlüssel 7BB9C367 von keyserver.ubuntu.com:80 anfordern
gpgkeys: no keyserver host provided
gpg: Interner Schlüsselserverfehler
gpg: Empfangen vom Schlüsselserver fehlgeschlagen: Schlüsselserverfehler

Lade der OpenPGP Key manuell von keyserver.ubuntu.com

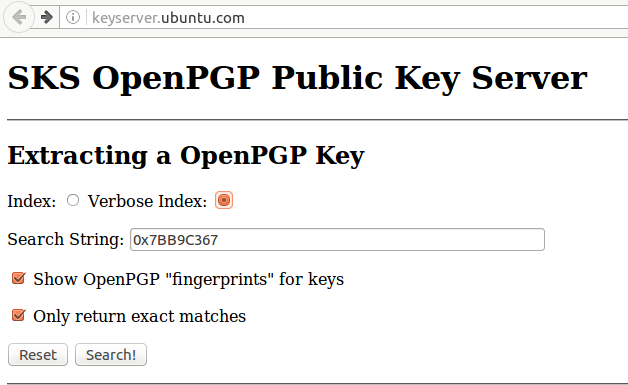
Öffne im Browser http://keyserver.ubuntu.com/ und trage den angeforderten Schlüssel mit dem Prefix 0x ein. In unserem Beispiel: 0x7BB9C367 und selektiere Only return exact matches.

keyserver.ubuntu.com
OpenPGP Key von ubuntu

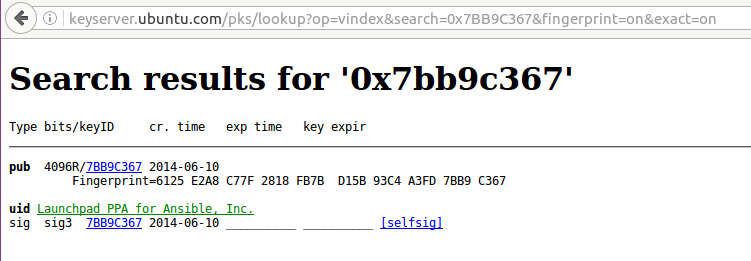
Den PGP key herunterladen (Beispiel 7BB9C367) und in einer key.txt Datei speichern.

keyserver.ubuntu.com
Ansible Beispiel OpenPGP Key von ubuntu

Den PGP key in apt-get installieren
$ sudo apt-key add key.txt

OK

Die Pakete updaten

$ sudo apt-get update

Holen:1 http://security.ubuntu.com/ubuntu xenial-security InRelease [94,5 kB]
Holen:2 http://ppa.launchpad.net/ansible/ansible/ubuntu xenial InRelease [18,1 kB]  
OK:3 http://de.archive.ubuntu.com/ubuntu xenial InRelease                                     
Holen:4 http://de.archive.ubuntu.com/ubuntu xenial-updates InRelease [94,5 kB]
OK:5 http://de.archive.ubuntu.com/ubuntu xenial-backports InRelease
Holen:6 http://ppa.launchpad.net/ansible/ansible/ubuntu xenial/main amd64 Packages [552 B]
Holen:7 http://ppa.launchpad.net/ansible/ansible/ubuntu xenial/main i386 Packages [552 B]
Holen:8 http://ppa.launchpad.net/ansible/ansible/ubuntu xenial/main Translation-en [340 B]
Holen:9 http://de.archive.ubuntu.com/ubuntu xenial-updates/main amd64 Packages [205 kB]
Holen:10 http://de.archive.ubuntu.com/ubuntu xenial-updates/main i386 Packages [202 kB]
Holen:11 http://de.archive.ubuntu.com/ubuntu xenial-updates/universe amd64 Packages [86,9 kB]
Holen:12 http://de.archive.ubuntu.com/ubuntu xenial-updates/universe i386 Packages [84,2 kB]
Es wurden 787 kB in 1 s geholt (441 kB/s).
Paketlisten werden gelesen... Fertig

Proxy für apt-get in Ubuntu

apt-get in Ubuntu (getestet mit 16.04) ignoriert die standard export Einstellung (z.B. export http_proxy=http://username:password@proxyserver:port).

$ sudo apt-get update

[sudo] Passwort für tomas:
Fehl:1 http://security.ubuntu.com/ubuntu xenial-security InRelease
»security.ubuntu.com« konnte nicht aufgelöst werden.
Fehl:2 http://de.archive.ubuntu.com/ubuntu xenial InRelease
»de.archive.ubuntu.com« konnte nicht aufgelöst werden.
Fehl:3 http://de.archive.ubuntu.com/ubuntu xenial-updates InRelease
»de.archive.ubuntu.com« konnte nicht aufgelöst werden.
Fehl:4 http://de.archive.ubuntu.com/ubuntu xenial-backports InRelease
»de.archive.ubuntu.com« konnte nicht aufgelöst werden.
Paketlisten werden gelesen... Fertig
W: Failed to fetch http://de.archive.ubuntu.com/ubuntu/dists/xenial/InRelease  »de.archive.ubuntu.com« konnte nicht aufgelöst werden.
W: Failed to fetch http://de.archive.ubuntu.com/ubuntu/dists/xenial-updates/InRelease  »de.archive.ubuntu.com« konnte nicht aufgelöst werden.
W: Failed to fetch http://de.archive.ubuntu.com/ubuntu/dists/xenial-backports/InRelease  »de.archive.ubuntu.com« konnte nicht aufgelöst werden.
W: Failed to fetch http://security.ubuntu.com/ubuntu/dists/xenial-security/InRelease  »security.ubuntu.com« konnte nicht aufgelöst werden.
W: Einige Indexdateien konnten nicht heruntergeladen werden. Sie wurden ignoriert oder alte an ihrer Stelle benutzt.

Behebung

Um apt-get über proxy laufen zu lassen ist notwendig:
Terminal öffen und die Datei /etc/apt/apt.conf mit folgender Konfiguration erstellen:
$ sudo vi /etc/apt/apt.conf

Acquire::http::proxy "http://username:password@proxyserver:port/";
Acquire::https::proxy "https://username:password@proxyserver:port/";
Acquire::socks::proxy "socks://username:password@proxyserver:port/";


$ sudo apt-get update

[sudo] Passwort für tomas: 
Holen:1 http://security.ubuntu.com/ubuntu xenial-security InRelease [94,5 kB]
OK:2 http://de.archive.ubuntu.com/ubuntu xenial InRelease  
OK:3 http://de.archive.ubuntu.com/ubuntu xenial-updates InRelease              
OK:4 http://de.archive.ubuntu.com/ubuntu xenial-backports InRelease            
Es wurden 94,5 kB in 0 s geholt (147 kB/s).                   
Paketlisten werden gelesen... Fertig


Erstelle SSH key pair in Ubuntu

Wie erstelle ich eine ssh key pair

ssh key pair (public und private) wird folgend erstellt
$ ssh-keygen

Generating public/private rsa key pair.
Enter file in which to save the key (/home/tomas/.ssh/id_rsa): 
Created directory '/home/tomas/.ssh'.
Enter passphrase (empty for no passphrase): PRIVATES PASSWORD
Enter same passphrase again: PRIVATES PASSWORD
Your identification has been saved in /home/tomas/.ssh/id_rsa.
Your public key has been saved in /home/tomas/.ssh/id_rsa.pub.
The key fingerprint is:
SHA256:KBYwJtnOiI/tCtmaz4ePyT2/HzUnKDQXr37vCqMQpTc tomas@tomas-VirtualBox
The key's randomart image is:
+---[RSA 2048]----+
|.o+     .        |
|.o.o     o       |
|.+  . + . .      |
|o o  = + o       |
| +  = E S + .    |
|.oo. + + . +     |
|o....   = .      |
|.=o+o. . = .     |
|+o*ooo+o. .oo    |
+----[SHA256]-----+