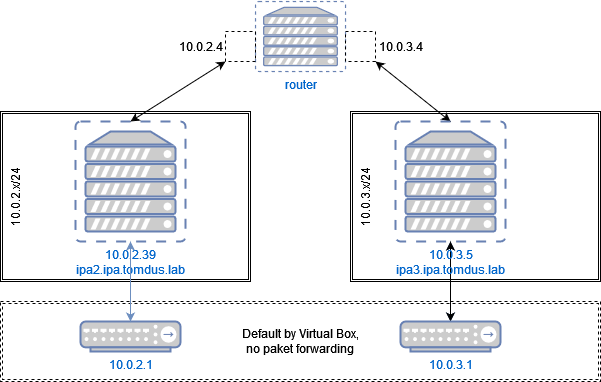
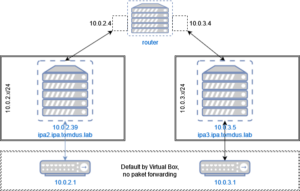
IPA Server can be installed standalone or as master – master cluster
Create Master – Master cluster (simple option)
- Install and create stand alone IPA Server (@ipa1)
- Install client on IPA Client (@ipa3)
- Promote ipa client on @ipa3 to server a master
- Install ca certificates on ipa3
1. Install and create standalone IPA Sever
For simplicty all password are 123456798; dns forwarder 192.168.178.1 (acces to internet)
sudo dnf module enable idm:DL1/server -y
sudo dnf module enable idm:DL1/dns -y
sudo dnf distro-sync
sudo dnf module install idm:DL1/server -y
sudo dnf module install idm:DL1/dns -y
sudo dnf install ipa-server -y
sudo dnf install ipa-server-dns -y
sudo ipa-server-install --domain=ipa.tomdus.lab --realm=IPA.TOMDUS.LAB --ds-password=123456798 --admin-password=123456798 --mkhomedir --ssh-trust-dns --idstart=100000 --no-ntp --setup-dns --forwarder=192.168.178.1 --auto-reverse --allow-zone-overlap

...

sudo firewall-cmd --add-service={http,https,ldap,ldaps,kerberos,kpasswd,dns} --permanent
sudo firewall-cmd --reload
2. Install IPA client
In order to install ipa client it is sufficient to enable only idl:DL1/client module, thus as this server will be promoted to IPA Replica muss enable idl:DL1/server and idl:DL1/dns (required by DNS Server)
[tomas@ipa3 ~]$ sudo dnf module list idm:DL1
Last metadata expiration check: 0:00:17 ago on Wed 08 Jun 2022 01:45:55 PM CEST.
CentOS Stream 8 - AppStream
Name Stream Profiles Summary
idm DL1 adtrust, client, common [d], dns, server The Red Hat Enterprise Linux Identity Management system module
Hint: [d]efault, [e]nabled, [x]disabled, [i]nstalled
sudo dnf module enable idm:DL1/server -y
sudo dnf module enable idm:DL1/dns -y
sudo dnf distro-sync -y

sudo dnf module install idm:DL1/server -y
sudo dnf module install idm:DL1/dns -y
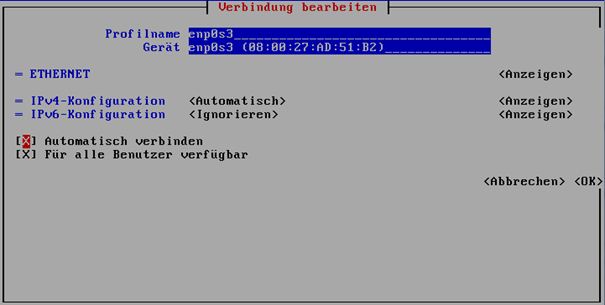
Verify network connection on ipa3
[tomas@ipa3 ~]$ ping 10.0.2.38  (IP Address of IPA1)[tomas@ipa3 ~]$ cat /etc/resolv.conf
# Generated by NetworkManager
search ipa.tomdus.lab
nameserver 10.0.2.38
[tomas@ipa3 ~]$ dig ipa1.ipa.tomdus.lab
; <<>> DiG 9.11.36-RedHat-9.11.36-3.el8 <<>> ipa1.ipa.tomdus.lab
;; global options: +cmd
;; Got answer:
;; ->>HEADER<<- opcode: QUERY, status: NOERROR, id: 10689
;; flags: qr aa rd; QUERY: 1, ANSWER: 1, AUTHORITY: 2, ADDITIONAL: 2
;; WARNING: recursion requested but not available

;; OPT PSEUDOSECTION:
; EDNS: version: 0, flags:; udp: 1232
; COOKIE: b6dd4e79f5137f6a795623dc62a096d3ae0ca70d1d10c863 (good)
;; QUESTION SECTION:
;ipa1.ipa.tomdus.lab. IN A

;; ANSWER SECTION:
ipa1.ipa.tomdus.lab. 1200 IN A 10.0.2.38

;; AUTHORITY SECTION:
ipa.tomdus.lab. 86400 IN NS ipa1.ipa.tomdus.lab.

;; Query time: 1 msec
;; SERVER: 10.0.2.38#53(10.0.2.38)
;; WHEN: Wed Jun 08 14:32:17 CEST 2022
;; MSG SIZE rcvd: 141
Install client
[tomas@ipa3 ~]$ sudo dnf install ipa-server -y[tomas@ipa3 ~]$ sudo ipa-client-install --mkhomedir --domain=ipa.tomdus.lab --realm IPA.TOMDUS.LAB --principal admin --password 123456798 --no-ntp
This program will set up IPA client.
Version 4.9.8

Discovery was successful!
Client hostname: ipa3.ipa.tomdus.lab
Realm: IPA.TOMDUS.LAB
DNS Domain: ipa.tomdus.lab
IPA Server: ipa1.ipa.tomdus.lab
BaseDN: dc=ipa,dc=tomdus,dc=lab

Continue to configure the system with these values? [no]: yes
Skipping chrony configuration
Successfully retrieved CA cert
Subject: CN=Certificate Authority,O=IPA.TOMDUS.LAB
Issuer: CN=Certificate Authority,O=IPA.TOMDUS.LAB
Valid From: 2022-06-02 06:40:56
Valid Until: 2042-06-02 06:40:56

Enrolled in IPA realm IPA.TOMDUS.LAB
Created /etc/ipa/default.conf
Configured /etc/sssd/sssd.conf
Configured /etc/krb5.conf for IPA realm IPA.TOMDUS.LAB
Systemwide CA database updated.
Hostname (ipa3.ipa.tomdus.lab) does not have A/AAAA record.
Missing reverse record(s) for address(es): 10.0.3.5.
Adding SSH public key from /etc/ssh/ssh_host_ecdsa_key.pub
Adding SSH public key from /etc/ssh/ssh_host_ed25519_key.pub
Adding SSH public key from /etc/ssh/ssh_host_rsa_key.pub
SSSD enabled
Configured /etc/openldap/ldap.conf
Configured /etc/ssh/ssh_config
Configured /etc/ssh/sshd_config
Configuring ipa.tomdus.lab as NIS domain.
Client configuration complete.
The ipa-client-install command was successful
Client has been succesfully registered and visible inside IPA server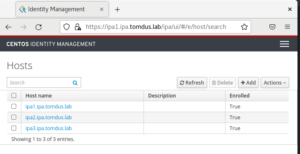
3. Promote client ipa3 to replica
In order to promote client as a replica the client muss be assigned to host group ipaservers 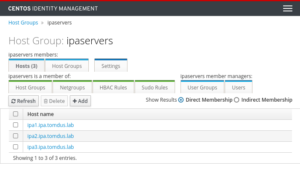
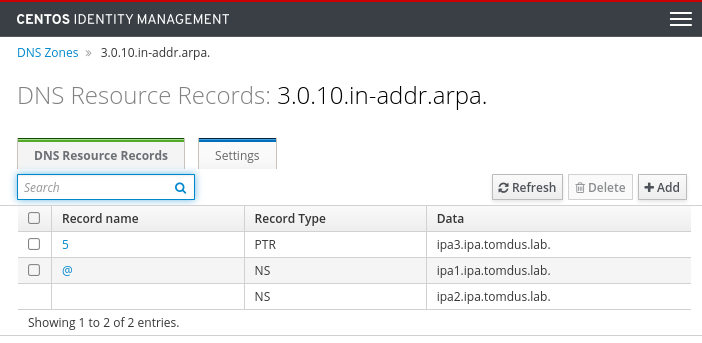
Check DNS entries for ipa3
[tomas@ipa3 ~]$ dig +short ipa3.ipa.tomdus.lab
10.0.3.5[tomas@ipa3 ~]$ host -r 10.0.3.5
Host 5.3.0.10.in-addr.arpa. not found: 3(NXDOMAIN)
Common problem that can be solved inside DNS
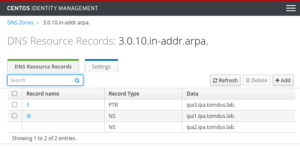
Check – OK
[tomas@ipa3 ~]$ dig +short ipa3.ipa.tomdus.lab
10.0.3.5[tomas@ipa3 ~]$ host -r 10.0.3.5
5.3.0.10.in-addr.arpa domain name pointer ipa3.ipa.tomdus.lab.
Promote client to replica
[tomas@ipa3 ~]$ sudo ipa-replica-install --admin-password=123456798 --mkhomedir --ssh-trust-dns --setup-dns --forwarder=192.168.178.1 --auto-reverse --allow-zone-overlap
Lookup failed: Preferred host ipa3.ipa.tomdus.lab does not provide DNS.
Checking DNS forwarders, please wait ...
Reverse record for IP address 10.0.3.5 already exists OK as we corrected is manually above
Run connection check to master
Connection check OK
Disabled p11-kit-proxy
Configuring directory server (dirsrv). Estimated time: 30 seconds[1/38]: creating directory server instance
Validate installation settings ...
Create file system structures ...
Perform SELinux labeling ...
Create database backend: dc=ipa,dc=tomdus,dc=lab ...
Perform post-installation tasks ...[2/38]: tune ldbm plugin[3/38]: adding default schema[4/38]: enabling memberof plugin[5/38]: enabling winsync plugin[6/38]: configure password logging[7/38]: configuring replication version plugin[8/38]: enabling IPA enrollment plugin[9/38]: configuring uniqueness plugin[10/38]: configuring uuid plugin[11/38]: configuring modrdn plugin[12/38]: configuring DNS plugin[13/38]: enabling entryUSN plugin[14/38]: configuring lockout plugin[15/38]: configuring topology plugin[16/38]: creating indices[17/38]: enabling referential integrity plugin[18/38]: configuring certmap.conf[19/38]: configure new location for managed entries[20/38]: configure dirsrv ccache and keytab[21/38]: enabling SASL mapping fallback[22/38]: restarting directory server[23/38]: creating DS keytab[24/38]: ignore time skew for initial replication[25/38]: setting up initial replication
Starting replication, please wait until this has completed.
Update in progress, 4 seconds elapsed
Update succeeded
[26/38]: prevent time skew after initial replication[27/38]: adding sasl mappings to the directory[28/38]: updating schema[29/38]: setting Auto Member configuration[30/38]: enabling S4U2Proxy delegation[31/38]: initializing group membership[32/38]: adding master entry[33/38]: initializing domain level[34/38]: configuring Posix uid/gid generation[35/38]: adding replication acis[36/38]: activating sidgen plugin[37/38]: activating extdom plugin[38/38]: configuring directory to start on boot
Done configuring directory server (dirsrv).
Replica DNS records could not be added on master: Insufficient access: Insufficient 'add' privilege to add the entry 'idnsname=ipa3,idnsname=ipa.tomdus.lab.,cn=dns,dc=ipa,dc=tomdus,dc=lab'.
Configuring Kerberos KDC (krb5kdc)[1/5]: configuring KDC[2/5]: adding the password extension to the directory[3/5]: creating anonymous principal[4/5]: starting the KDC[5/5]: configuring KDC to start on boot
Done configuring Kerberos KDC (krb5kdc).
Configuring kadmin[1/2]: starting kadmin [2/2]: configuring kadmin to start on boot
Done configuring kadmin.
Configuring directory server (dirsrv)[1/3]: configuring TLS for DS instance[2/3]: importing CA certificates from LDAP[3/3]: restarting directory server
Done configuring directory server (dirsrv).
Configuring the web interface (httpd)[1/22]: stopping httpd[2/22]: backing up ssl.conf[3/22]: disabling nss.conf[4/22]: configuring mod_ssl certificate paths[5/22]: setting mod_ssl protocol list[6/22]: configuring mod_ssl log directory[7/22]: disabling mod_ssl OCSP[8/22]: adding URL rewriting rules[9/22]: configuring httpd
Nothing to do for configure_httpd_wsgi_conf[10/22]: setting up httpd keytab[11/22]: configuring Gssproxy[12/22]: setting up ssl[13/22]: configure certmonger for renewals[14/22]: publish CA cert[15/22]: clean up any existing httpd ccaches[16/22]: enable ccache sweep[17/22]: configuring SELinux for httpd[18/22]: create KDC proxy config[19/22]: enable KDC proxy[20/22]: starting httpd[21/22]: configuring httpd to start on boot[22/22]: enabling oddjobd
Done configuring the web interface (httpd).
Configuring ipa-otpd[1/2]: starting ipa-otpd [2/2]: configuring ipa-otpd to start on boot
Done configuring ipa-otpd.
Custodia uses 'ipa1.ipa.tomdus.lab' as master peer.
Configuring ipa-custodia[1/4]: Generating ipa-custodia config file[2/4]: Generating ipa-custodia keys[3/4]: starting ipa-custodia [4/4]: configuring ipa-custodia to start on boot
Done configuring ipa-custodia.
Configuring certificate server (pki-tomcatd)[1/2]: configure certmonger for renewals[2/2]: Importing RA key
Done configuring certificate server (pki-tomcatd).
Configuring Kerberos KDC (krb5kdc)[1/1]: installing X509 Certificate for PKINIT
Done configuring Kerberos KDC (krb5kdc).
Applying LDAP updates
Upgrading IPA:. Estimated time: 1 minute 30 seconds[1/10]: stopping directory server[2/10]: saving configuration[3/10]: disabling listeners[4/10]: enabling DS global lock[5/10]: disabling Schema Compat[6/10]: starting directory server[7/10]: upgrading server[8/10]: stopping directory server[9/10]: restoring configuration[10/10]: starting directory server
Done.
Finalize replication settings
Restarting the KDC
dnssec-validation yes
Configuring DNS (named)[1/8]: generating rndc key file[2/8]: setting up our own record[3/8]: adding NS record to the zones[4/8]: setting up kerberos principal[5/8]: setting up named.conf
created new /etc/named.conf
created named user config '/etc/named/ipa-ext.conf'
created named user config '/etc/named/ipa-options-ext.conf'
created named user config '/etc/named/ipa-logging-ext.conf'[6/8]: setting up server configuration[7/8]: configuring named to start on boot[8/8]: changing resolv.conf to point to ourselves
Done configuring DNS (named).
Restarting the web server to pick up resolv.conf changes
Configuring DNS key synchronization service (ipa-dnskeysyncd)[1/7]: checking status[2/7]: setting up bind-dyndb-ldap working directory[3/7]: setting up kerberos principal[4/7]: setting up SoftHSM[5/7]: adding DNSSEC containers
DNSSEC container exists (step skipped)[6/7]: creating replica keys[7/7]: configuring ipa-dnskeysyncd to start on boot
Done configuring DNS key synchronization service (ipa-dnskeysyncd).
Restarting ipa-dnskeysyncd
Restarting named
Updating DNS system records

Global DNS configuration in LDAP server is not empty
The following configuration options override local settings in named.conf:

API Version number was not sent, forward compatibility not guaranteed. Assuming server's API version, 2.245
Forward policy: first
IPA DNS servers: ipa1.ipa.tomdus.lab, ipa2.ipa.tomdus.lab

Configuring SID generation[1/7]: creating samba domain object
Samba domain object already exists[2/7]: adding admin(group) SIDs
Admin SID already set, nothing to do
Admin group SID already set, nothing to do[3/7]: adding RID bases
RID bases already set, nothing to do[4/7]: updating Kerberos config
'dns_lookup_kdc' already set to 'true', nothing to do.[5/7]: activating sidgen task[6/7]: restarting Directory Server to take MS PAC and LDAP plugins changes into account[7/7]: adding fallback group
Fallback group already set, nothing to do
Done.

WARNING: The CA service is only installed on one server (ipa1.ipa.tomdus.lab).
It is strongly recommended to install it on another server.
Run ipa-ca-install(1) on another master to accomplish this.

The ipa-replica-install command was successful
Enable firewall
sudo firewall-cmd --add-service={http,https,ldap,ldaps,kerberos,kpasswd,dns} --permanent
sudo firewall-cmd --reload
4. Install ca certificates on ipa3
[tomas@ipa3 ~]$ sudo ipa-ca-install
Directory Manager (existing master) password:

Run connection check to master
Connection check OK
Configuring certificate server (pki-tomcatd). Estimated time: 3 minutes[1/28]: creating certificate server db[2/28]: setting up initial replication
Starting replication, please wait until this has completed.
Update in progress, 5 seconds elapsed
Update succeeded
[3/28]: creating ACIs for admin
...[26/28]: importing IPA certificate profiles[27/28]: configuring certmonger renewal for lightweight CAs[28/28]: deploying ACME service
Done configuring certificate server (pki-tomcatd).
Updating DNS system records